


Mapbox Marker Clustering
Performance can begin to degrade pretty quickly when you are trying to show large amounts of data on a map. Even at hundreds of markers using Mapbox via react-map-gl, you may feel it start to lag. By clustering the points together you can improve performance greatly, all while presenting the data in a more approachable way.
Supercluster is the go-to package for clustering points together on a map. For using supercluster together with React I created a useSupercluster hook to make things easier. This article shows how to integrate clustering with supercluster into your React Mapbox map.
Full source code of this project can be found here.
Mapbox setup in React
Before fetching data to display, before clustering that data to display on the map, we need to set Mapbox up. I have an intro to Mapbox video if you haven't worked with the react-map-gl package before.
Mapbox in React requires you to manage Mapbox's viewport in state. This is where we can set initial values which are later updated via the onViewportChange event.
We will also create a mapRef variable to store a reference to the map itself. This is required in order to call functions on the map, in our case to get the bounding box of the map.
When developing this locally, I am storing my Mapbox token in a file called .env.local, and by naming it with the prefix REACT_APP_, it will get loaded into the app automatically by create react app.
export default function App() {// setup mapconst [viewport, setViewport] = useState({latitude: 52.6376,longitude: -1.135171,width: "100vw",height: "100vh",zoom: 12});const mapRef = useRef();// load and prepare data// get map bounds// get clusters// return mapreturn (<ReactMapGL{...viewport}maxZoom={20}mapboxApiAccessToken={process.env.REACT_APP_MAPBOX_TOKEN}onViewportChange={newViewport => {setViewport({ ...newViewport });}}ref={mapRef}>{/* markers here */}</ReactMapGL>);}
Preparing data for supercluster
Data from an external/remote source will most likely need to be massaged into the format required by the supercluster library. The example below uses SWR to fetch remote data using hooks.
We must produce an array of GeoJSON Feature objects, with the geometry of each object being a GeoJSON Point.
An example of the data looks like:
[{"type": "Feature","properties": {"cluster": false,"crimeId": 78212911,"category": "anti-social-behaviour"},"geometry": { "type": "Point", "coordinates": [-1.135171, 52.6376] }}]
Fetching the data using SWR and converting it into the proper format looks like:
const fetcher = (...args) => fetch(...args).then(response => response.json());export default function App() {// setup map// load and prepare dataconst url ="https://data.police.uk/api/crimes-street/all-crime?lat=52.629729&lng=-1.131592&date=2019-10";const { data, error } = useSwr(url, { fetcher });const crimes = data && !error ? data : [];const points = crimes.map(crime => ({type: "Feature",properties: { cluster: false, crimeId: crime.id, category: crime.category },geometry: {type: "Point",coordinates: [parseFloat(crime.location.longitude),parseFloat(crime.location.latitude)]}}));// get map bounds// get clusters// return map}
Getting map bounds
For supercluster to return the clusters based on the array of points we created in the previous section, we need to provide it with two additional pieces of information:
- The map bounds:
[westLng, southLat, eastLng, northLat] - The map zoom: In Mapbox this will come from our
viewport.zoomstate
The bounds can be gathered by accessing the mapRef.current property that we set up at the beginning. By stringing a few function calls together we can get the data and place it into the correct format.
export default function App() {// setup map// load and prepare data// get map boundsconst bounds = mapRef.current? mapRef.current.getMap().getBounds().toArray().flat(): null;// get clusters// return map}
Fetching clusters from hook
With our points in the correct order, and with the bounds and zoom accessible, it's time to retrieve the clusters. This will use the useSupercluster hook provided by the use-supercluster package.
It returns you through a destructured object an array of clusters and, if you need it, the supercluster instance variable.
export default function App() {// setup map// load and prepare data// get map bounds// get clustersconst { clusters, supercluster } = useSupercluster({points,bounds,zoom: viewport.zoom,options: { radius: 75, maxZoom: 20 }});// return map}
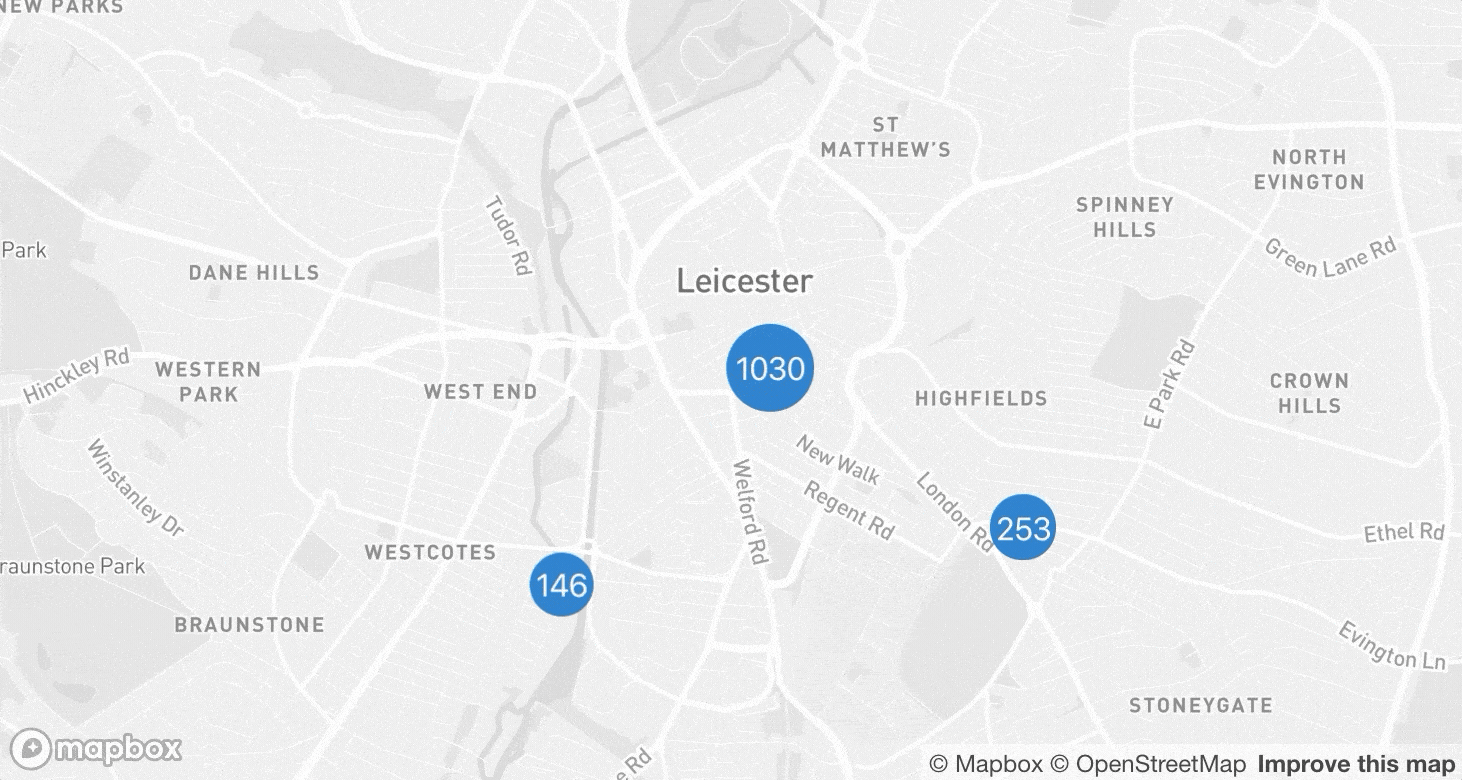
Clusters are an array of GeoJSON Feature objects, but some of them represent a cluster of points, and some represent individual points that you created above. A lot of it depends on your zoom level and how many points would be within a specific radius. When the number of points gets small enough, supercluster gives us individual points rather than clusters. The example below has a cluster (as denoted by the properties on it) and an individual point (which in our case represents a crime).
[{"type": "Feature","id": 1461,"properties": {"cluster": true,"cluster_id": 1461,"point_count": 857,"point_count_abbreviated": 857},"geometry": {"type": "Point","coordinates": [-1.132138301050194, 52.63486758501364]}},{"type": "Feature","properties": {"cluster": false,"crimeId": 78212911,"category": "anti-social-behaviour"},"geometry": { "type": "Point", "coordinates": [-1.135171, 52.6376] }}]
Displaying clusters as markers
Because the clusters array contains features which represent either a cluster or an individual point, we have to handle that while mapping them. Either way, they both have coordinates, and we can use the cluster property to determine which is which.
Styling the clusters is up to you, I have some simple styles applied to each of the markers:
.cluster-marker {color: #fff;background: #1978c8;border-radius: 50%;padding: 10px;display: flex;justify-content: center;align-items: center;}.crime-marker {background: none;border: none;}.crime-marker img {width: 25px;}
Then as I am mapping the clusters, I change the size of the cluster with a calculation based on how many points the cluster contains: ${10 + (pointCount / points.length) * 20}px.
export default function App() {// setup map// load and prepare data// get map bounds// get clusters// return mapreturn (<ReactMapGL>{clusters.map(cluster => {// every cluster point has coordinatesconst [longitude, latitude] = cluster.geometry.coordinates;// the point may be either a cluster or a crime pointconst {cluster: isCluster,point_count: pointCount} = cluster.properties;// we have a cluster to renderif (isCluster) {return (<Markerkey={`cluster-${cluster.id}`}latitude={latitude}longitude={longitude}><divclassName="cluster-marker"style={{width: `${10 + (pointCount / points.length) * 20}px`,height: `${10 + (pointCount / points.length) * 20}px`}}>{pointCount}</div></Marker>);}// we have a single point (crime) to renderreturn (<Markerkey={`crime-${cluster.properties.crimeId}`}latitude={latitude}longitude={longitude}><button className="crime-marker"><img src="/custody.svg" alt="crime doesn't pay" /></button></Marker>);})}</ReactMapGL>);}
Animated zoom transition into a cluster
We can always zoom into the map ourselves, but supercluster provides a function called getClusterExpansionZoom, which when passed a cluster ID, it will return us which zoom level we need to change the map to in order for the cluster to be broken down into additional smaller clusters, or individual points.
const expansionZoom = Math.min(supercluster.getClusterExpansionZoom(cluster.id),20);
With the next zoom level provided to us by supercluster, we could simple update our Mapbox viewport state, but it wouldn't be a smooth transition. react-map-gl provides a class called FlyToInterpolator which animates the map to the new zoom and lat/lon rather than the change being instant.
setViewport({...viewport,latitude,longitude,zoom: expansionZoom,transitionInterpolator: new FlyToInterpolator({speed: 2}),transitionDuration: "auto"});
Where do the snippets of code above live? I have put them inside of an onClick event on the Marker's div for each cluster being rendered.
<Marker key={`cluster-${cluster.id}`} latitude={latitude} longitude={longitude}><divclassName="cluster-marker"style={{width: `${10 + (pointCount / points.length) * 20}px`,height: `${10 + (pointCount / points.length) * 20}px`}}onClick={() => {const expansionZoom = Math.min(supercluster.getClusterExpansionZoom(cluster.id),20);setViewport({...viewport,latitude,longitude,zoom: expansionZoom,transitionInterpolator: new FlyToInterpolator({speed: 2}),transitionDuration: "auto"});}}>{pointCount}</div></Marker>
Conclusion
Using react-map-gl, we have the ability to use Mapbox within our React app. Using use-supercluster we are able to use supercluster as a hook to render clusters of points onto our map.
Because we have access to the instance of supercluster, we're even able to grab the "leaves" (the individual points which make up a cluster) via the supercluster.getLeaves(cluster.id) function. With this we can show details about the x number of points contained within a cluster.